Sadly for Australian readers, the best of British spring/summer seasonal food has, via the markets, gripped my imagination, so recipes like this one (not nearly as exciting in an Aussie winter) may just need to be saved for a few months. Sorry.

Gazpacho

Ingredients (makes 4 serves)

  • 1kg very ripe tomatoes, diced
  • 1 green and 1 red pepper, cut into small pieces
  • 1 cucumber, peeled and diced
  • 2 cloves of garlic, peeled
  • 10 tbsp extra-virgin olive oil
  • 3 tbsp sherry or wine vinegar
  • 100g (4 slices) day-old white bread (crusts removed and soaked in water for an hour)
  • a pinch of cumin (to taste)
  • 2 tsp salt
  • 2 glasses of water
  • salt & pepper

Method

  1. Put the tomatoes, peppers and cucumber in a large bowl.
  2. Add the garlic, oil and vinegar. The correct amounts of oil and vinegar make the difference between good and delicious gazpacho, and you must use extra-virgin olive oil for the perfect flavour.
  3. Squeeze the excess water from the bread and add it, stirring the ingredients together.
  4. Pour into a blender and mix gently.
  5. Once you have a smooth consistency use the back of a ladle to push the soup through a sieve, and if it’s too thick add water – as gazpacho is eaten cold it should taste light and refreshing and have a liquid consistency.
  6. Add the cumin and salt, cover and refrigerate until cold.
  7. Serve with small bowls of the soup ingredients to garnish to taste

Notes

  • This recipe is lifted from here, after seeing it in yesterday’s Observer Magazine  – it is from Elena Meneses de Orozco, the wife of the Spanish ambassador. She says, in theinterview with Laura Potter:

“When we were little, my sister and I used to help my mother make gazpacho. Every household in Spain has a slightly different version, but my mother taught me this one and I’ve passed it on to the embassy chef, Rafael Perez. The traditional recipe was just water, bread, vinegar and garlic (poor vineyard workers ate it while working). The tomatoes and peppers were added when Columbus brought them to Spain in 1492. Now, summer isn’t summer without gazpacho – every family in Spain eats it every day for three months.”
I have been neglecting the food blog for ages, despite some plodding, but have been inspired by my friend Felicity’s zeal for Taste.com.au and Alexandra’s kind word of mouth referrals. This is a bit of a favourite over the last few weeks as it is easy, keeps well and is healthy/cheap/delicious. This recipe is based on this one, with a range of modifications after some testing.

Zucchini Slice

Ingredients (makes 5 serves as main, 15 as snack/canape)

  • 5 eggs
  • 150g (1 cup) self-raising flour, sifted
  • 375g / 2 or 3 large zucchini, grated (I prefer a fine grater)
  • 1 large onion, finely chopped
  • 100-200g ham or rindless bacon, chopped
  • 1 cup grated cheddar cheese
  • 60ml (1/4 cup) vegetable oil
  • salt and pepper to season
  • chilli flakes (optional)

Method

  1. Preheat oven to 170°C.
  2. Grease and line a 30 x 20cm lamington tin – I use two strips of baking paper that can later act help you lift it out – overlapped in a cross shape.
  3. Beat the eggs in a large bowl until combined, sift in the the flour and beat until smooth.
  4. Add zucchini, onion, bacon, cheese and oil and stir to combine. Season with salt and pepper, and chilli if using to give it a kick.
  5. Pour into the prepared pan and bake in oven for 30 minutes or until cooked through.
  6. Slice into squares and serve warm with a salad/vegies. Delicious cold the next day – reheats well.

Notes

  • Variations have included – leeks with the onion, both pre-cooked. Leeks worked well, and pre-cooking for a few minutes meant I could use oil and juices from the pan in place of the 1/4 cup above.
  • Can also scatter some cheese on top before or during cooking.

My sincerest apologies to everyone who waited for this recipe, promised ages ago (both of you!) Note that I’ve updated my header image to celebrate it’s delayed release.

Also, I need to make a confession from the outset – I’ve been eating the second recipe with my M’judrah since I learnt to make it, and so am not really a professional Loubia B’Zeit cook yet – other readers with more experience with this dish should feel welcome to comment below. Even though I’m now a more learned cook of this dish, I have eaten different versions of it many times, and had made my own version based on them, but then in research for this posting found out it’s a thing that other people have been doing for, well, thousands of years.

So here’s three versions:

  1. the most authentic,
  2. the version I’ve served many people before, and
  3. a combination of the three.

(i) Loubya bi Zayt

Ingredients (all recipes make 4 serves)

  • 1/2kg of fresh green beans, trimmed
  • 400g ripe tomatoes, diced or 1 tin of crushed tomatoes
  • 3 brown onions, chopped
  • 2 cloves of garlic crushed
  • 3 tbs olive oil
  • 2 tbs lemon juice
  • salt & pepper

Method

  1. Heat the olive oil in a pan over a medium heat. Add the chopped onions and sauté until very soft, around 10 minutes
  2. Add the garlic, beans, salt and pepper and any dried herbs (if using – see note below), and saute for on a low heat for 10-15 minutes, or till the beans started to wilt.
  3. Add the tomatoes and lemon juice, then bring to a boil.
  4. Cover and cook over a very low heat until the tomatoes form a thick sauce – around 45 minutes.
  5. Season with fresh herbs or salt & pepper here if using them, but delicious as is.

(ii) Lebanese Green Beans (with Tomatoes)

Ingredients

  • 1/2kg of fresh green beans, trimmed
  • 3 tbs olive oil
  • 2 tbs lemon juice
  • salt
  • 400g ripe tomatoes, diced (optional)

Method

  1. Boil/steam the beans until they’re relatively soft – some people like the beans almost falling apart, but they can’t be too firm or they won’t absorb the dressing properly.
  2. While the beans are cooking, mix up the olive oil, lemon juice and salt to make the dressing .
  3. If you want to use tomatoes, dice them here too.
  4. When the beans are ready, drain in a colander, return to pot. Using a serving size spoon, press the dressing into the beans (and tomatoes if using) and mix well.
  5. Can be served hot or cold – I like to eat with m’judrah.

Note

  • This dish doesn’t obviously doesn’t have a tomato sauce, but instead I sometimes (before I saw the light and found so many recipes) I just added diced tomatoes with the dressing. I’d prepare these first, along with the dressing, so that they both could be ‘pressed’ into the warm beans. As a general cooking tip, read about mise en place.

(iii) Vee’s ‘Skip’ Loubya bi Zayt

This method quickly boils/steams/microwaves the beans first, then uses the pot to make the tomato mixture which the beans can be added to.

Ingredients

  • 1/2kg of fresh green beans, trimmed
  • 1 Tbsp (to a generous glug) EV olive oil
  • 1 – 2 large brown onion(s), finely diced
  • 2 cloves of garlic crushed
  • 400g tin of crushed tomatoes
  • 3 tbs olive oil
  • 2 tbs lemon juice
  • salt

Method

  1. As with recipe 2 above, boil/steam the beans until they’re tender.
  2. While the beans are cooking, saute the chopped onions, garlic and some salt in olive oil until very soft.
  3. Add the tomatoes and cook for another 2-3 minutes, until heated through.
  4. Once the beans are ready, mix the lemon juice and oil and pour over the drained beans.
  5. Add the dressed beans to the tomatoe mixture, cook futher if the mixture needs to be reduced.
  6. Serve with m’judrah and Lebanes-style yoghurt.

Notes

  • This version as I cook it now is most like Spanish versions of this recipe, known as Judías verdes con tomate, see here.

General Notes

  • This was the best blog entry I found for this dish – it explains the cooking method well and has several useful links.
  • Lots of Lebanese recipe sites, and my friend Katherine who taught me this dish (who learnt it cooking with her family), all have a particular method of trimming and preparing the beans: break the ends of by hand and then break into halves or thirds by hand. Probably more authentic, and a reminder this dish is some more peasant food that doesn’t require OTT preparation with a ruler or sharp knife.
  • This dish, has thousands of variations- I think it is called Zyetinyagli Fassolakia, Fassulya or Fasulye in Greek (similar in origin to Fasolada I guess?) and the Internet reveal endless variations from across the Middle East, North Africa and the Mediterrainian. Some ideas you may want to try:
    • several sites, particularly Greek ones suggest boosting this dish with some finely sliced/diced potatoes or carrots – these would need to be either sliced finely enough to cook in the oil, or pre-boiled with the beans to a similar softness. There is a demo of a Greek method here.
    • This really good Lebanese recipe site features mint in with their green beans – something I love, so will try and update this when I do.
    • One of the more exotic variations was this Algerian recipe, including walnuts and several spices, but no tomatoes.
    • Lots of dishes include several spices, including cinnamon, all spice (go easy there), cumin, paprika or even a little cayenne. Experiment with your favourite spices, or to match another dish from the general region.

What is mise en place?

It is defined as: n, in professional cooking, proper planning of equipment and ingredients for a food preparation and assembly station, Et. French ‘put in place’, (usage cooking)

[From: Webster’s New Millennium™ Dictionary of English, Preview Edition (v 0.9.6). Lexico Publishing Group, LLC. 27 Feb. 2007. <Dictionary.com >]

What are you recommending this then?

Well, I saw this entry about it on The Happiness Project, a blog about erm.. happiness that I read, and it is certainly linked to the recipe I’ve got to post today. Although the focus of Gretchen’s blog is about life and happiness, other more food-focused blogs that discuss it, like this one, show that it can make cooking easier.

By having all the ingredients ready and diced, all the implements checked and on hand, and (the bit I fail on usually..) by reading a recipe all the way to the end, you’re far less likely to feel rushed and also to have an accident/disaster. It’s just like the TV cooking shows, but you don’t get a production assistant to fill up all the little glass bowls. (Sadly, after a long day at work, it also doens’t allow you to pull out a here’s-one-I-prepared-earlier, no matter how dearly you might wish to….)

Just something I’ve been thinking about as I settle in to a new kitchen, badly in need of better pots and implements (which is really adding to the challenges of cooking in it, really, must keep buying more things!) I’m also trying to inspire my housemates, two of whom are kitchen novices to get into cooking, and this makes the whole experience more zen.

Mjudrah

(Also spelt Mjudra, and Mujaddara, Mejadra or Mudardara, apparently – I pronounce it mm-judd-ruh, but am no authority.)

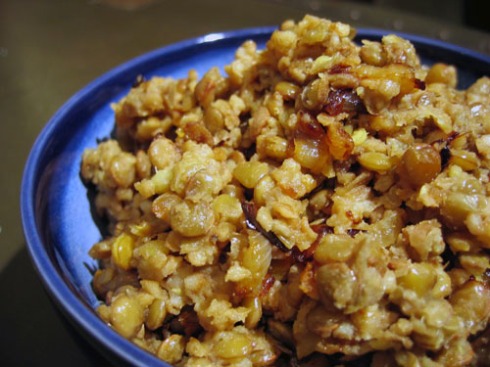
This is a staple from my Kirketon Road, Darlinghurst/Sydney days – a delicious, nutritious and filling Lebanese dish. As a traditional peasant food, there are endless variations of this dish (village to village, plus Skip modifications), but this is the one I learnt. This humble dish is cheap to make, so is very handy when one is paid monthly, in any currency. A large batch (and it’s super-easy to make a double batch) both reheats nicely and can be made from agreements you should always have on hand.

M’judrah

Ingredients (makes 4 serves)

  • 1 large onion, finely diced
  • 1 Tbsp (to a generous glug) EV olive oil
  • ½ cup brown rice
  • 1 cup brown lentils
  • About 1L hot water (enough to cover the lentils by about 20mm)
  • 1-2 good quality stock cubes (feel free to post me some Massel Ultracubes, Aussies)

Method

  1. Saute chopped onions in olive oil until very soft.
  2. Wash lentils and rice (I don’t really do this, but a lot recipes online feature it.)
  3. Add both lentils and rice to onions and sauté a few minutes more, stirring well to coat with onion juices and oil.
  4. Add hot water, stock cube and some salt to taste.
  5. Cover, bring to a boil and simmer for at least 25-30 minutes, to taste – some people cook it much longer to make it like a thick porridge. Add water if necessary to prevent things from drying out, but no more.
  6. Can be served hot or cold – I like to eat with plain yogurt on top.

Notes

  • This dish has relatives – the Indian Khichdi and the Welsh/British Kedgeree. This is one of the many gems I’ve learned at my weekly Marylebone Farmer’s Market outing with Andrea and Elizabeth – have my eye on some smoked haddock next Sunday, so watch this space for a Kedgeree attempt.
  • I did lots of research into other people’s recipes online here, even though this is a meal I just make from memory – it is worth mentioning this page, Memories of a Lebanese Garden, which was one of the most beautiful I found.
  • Two very common variations: use of caramalised onions as a topping, and cooking with wheat or other grains instead of rice.
  • Will post the green bean salad I usually serve with this dish here shortly.
  • This image of Mjudrah above is actually from here – will take my own sometime, but wanted to show that this dish is very mushy looking.

KurzLangLogo

Another place that had caught my eye on my lunch time walks around my office, Kurz & Lang is another lunch spot that offers both great produce and something a little different. I’m not sure that a month in Germany for a World Cup subsisting on sausages makes you an expert, but I am confident that the bratwurst here are authentic – they’re imported fresh from small independent producer in the rural area between Frankfurt and Cologne in Germany.

The menu is simple – a few different types of sausage, served with bread, delicious German mustard and ketchup (the lunch special costs another 60p for delicious sauerkraut and grilled potato cubes.) I couldn’t eat it everyday (and still wear my own clothes,) but it was tasty and delicious – and I looked after myself by getting some extra fruit from a nearby vendor.

This review shows they’re open late on weekends, and it’d be perfect after a few beers in the evening. Kurz & Lang also serve a list of German beers, including my favourite Löwenbräu.

Kurz & Lang, 1 St. John Street, Smithfield, London EC1M 4AA (Farringdon tube – 020 7253 6623)

  • Great produce, authentic German food, and good service – 4 stars.

Was really pleased that several people are enjoying this – so even though most of this section’s fans are in Australia, in the middle of summer, this was a good supper recipe inspired one in the thelondonpaper I read on the way out to Shepherd’s Bush for the Socceroos game last night.

This dish is really quick and simple, and of course can be modified wildly to your taste and what’s in the pantry. It’s a good way to get some vegies into your diet, will reheat nicely after work and is a light, healthy dinner. Serve with a bread roll and some snow peas for lunch.

Bacon, Bean & Pasta Soup

Ingredients (Makes 4 serves)

  • 8 rashers rindless streaky bacon
  • 2 leeks rinsed, halved and chopped
  • 4 carrots halved length-ways and sliced
  • 400g tin mixed beans, drained and rinsed
  • 1.5L stock, vegetable or chicken
  • 2 Tbsp tomato puree
  • 50g small pasta shapes
  • flat-leaf parsley
  • Parmesan cheese

Method

  1. Fry the bacon in a large non-stick pan (something big enough to make soup in) , until it is golden – streaky bacon will cook in it’s own fat, leaner bacon might need a little olive oil.
  2. Add the leeds and carrots and cook for about 5 minutes until softened (add some garlic and ginger here if you need the immune boost, or an onion if you have one and want to thicken this up a little.)
  3. Tip in the beans, stock, puree and pasta. Simmer until the pasta is cooked (packed will be a guide, but around 10 minutes)
  4. Stir through the parsley, serve in bowls with grated or shaved parmesan on top.

Notes

  • If you don’t keep tomato puree in the house, I don’t recommend touching tomato paste – you can always add a tin of tomatoes (mush them if they’re whole in the tin) and reduce the liquid a little. You should have tinned tomatoes in the pantry – they’re gold.
  • If you’re a vegetarian or bacon-hater, you can use some good un-salted butter to cook the leeks and carrots, and a vegetable stock as appropriate.

Known in my office as the café for “posh Italian sarnies”, this has been the early favourite as I have been trying to get out and explore the streets and lanes near my place of work.

Piada serve piadines, a filled flatbread. My research suggests they’re a northern Italian street food – from the Emilia-Romagna region. It’s a thin dough cooked (with olive oil) on a hot plate, and filled with simple but delicious produce. There are 13 different piadines on the menu, numbered zero through to quattordici (this superstitous bunch have skipped 13!) – so far I’ve had the Otto, with perfect spinach and mushrooms.

I’ve found some recipes here and here, but for inspiration check out the menu at the Piada website.

Piada, 12-14 St John St, EC1M 4AY (Farringdon tube – 020 7253 0472)

  • Delicious and fresh, with high quality produce and good service – 4.5 stars

Predictably, I usually use a Donna Hay recipe here – but this is a simple recipe, so I’ve just done a quick search and found a basic ingredients list and a few tips. My food processor is sitting under my family home in Melbourne, lonely and abandoned, but this type of pastry is easy enough by hand.

Shortcrust Pastry

Ingredients (makes enough pastry for a 25cm tart shell)

  • 240g plain flour
  • A good pinch of salt
  • 180 g unsalted butter at room temperature, diced into small cubes
  • 60 ml icy cold water – use an ice cube if you have it, or run the tap cold

Method

  1. Sift the flour and salt together into a bowl from height, to incorporate as much air as you can.
  2. Add cubes of soft butter, and cut into the flour with a knife.
  3. Rub butter in using just your fingertips, rub butter into flour until it resembles breadcrumbs.
  4. Add water very slowly and carefully – a tablespoon to begin with, then just small dribbles- I find just moistening your fingertips gives a small measure. Continue until it comes together as a dough.
  5. Rest the dough in the fridge, wrapped in plastic film or inside a plastic bag, for 20-30 minutes. This is so the gluten can do what it needs to do – so don’t serve this pastry to coeliacs.
  6. Remove, allow to warm up for a few minutes and then roll out for use – most recipes require you to blind bake the shell before introducing the filling. Bonne is a guru at this.

Notes

  • Suitable for use in savoury tarts and pies. Some sweet dishes use a Sweet Shortcrust Pastry (also called Rich Shortcrust Pastry)- as above, but with an egg yolk or two in with the butter and tablespoon of caster sugar added after the butter has been mixed in.
  • Pastry can be made in bulk and used as a standby from the freezer – make double and freeze for a month or two. Best defrosted a day in advance.
  • Sydney chef Damien Pignolet recommends using teaspoon of lemon juice made up to 60 ml with very cold water. You’lll still need to watch the texture if you do this – no two batches will need the same amount of liquid.
  • Delia Smith has a good, detailed, and illustrated lesson on her website that’s pretty good. She notes: “Being light with your fingers is not a special gift, it’s just a conscious decision, a signal the brain gives to the fingertips, and then a bit of concentration.”

Last weekend I went to the Marylebone Farmer’s Market with Andrea, who I’ve been staying with, and Elizabeth, a friend from my World Schools days. They go every week, for the ring of the market’s opening bell, followed by an almond croissant at the nearby Patisserie Valerie. Last week I only got a little bit of goat’s cheese (herb tart to follow) as I am yet to have a kitchen of my own, but I plan to make this a regular habit for my fresh food shopping. Also nearby is a gorgeous food store, La Fromagerie, which has gorgeous gifts written all over it.

May 2024
M T W T F S S
 12345
6789101112
13141516171819
20212223242526
2728293031